Specialist mould cleaning checklist and DIY guide
Mould can be a persistent and harmful problem in homes, leading to health issues and structural damage if not addressed promptly. Cleaning mould requires specific techniques and precautions to ensure it is removed effectively and safely.
Cliffy Cox is UK’s #1 mould cleaning company offering complete mould removal, remedial, sanitation and decontamination services across UK. They also offer free advice to all their clients across UK.
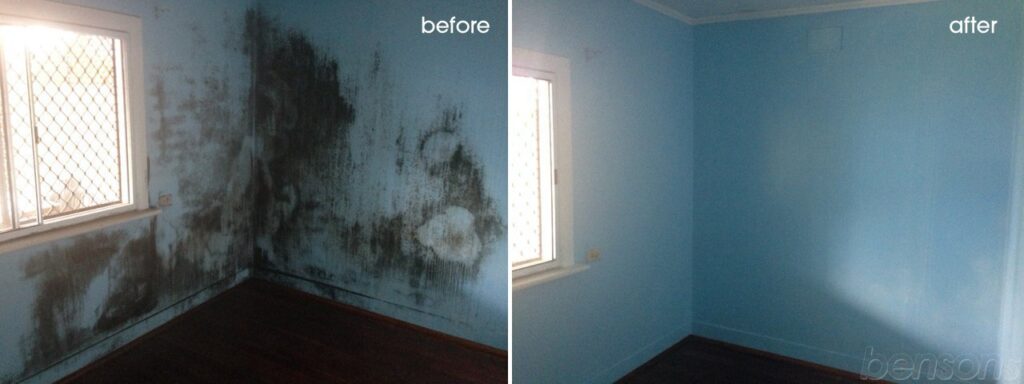
Below is a specialist mould cleaning checklist and a DIY guide to help you tackle mould in your home.
Specialist Mould Cleaning Checklist
**1. Safety First
- Protective Gear:
- Wear disposable gloves, a face mask (preferably an N95 respirator), and goggles to protect yourself from mould spores.
- Use old clothing that covers your skin, which can be washed or discarded after cleaning.
- Ventilation:
- Ensure proper ventilation in the affected area by opening windows and doors. Use fans to direct airflow outside.
- Isolate the Area:
- If possible, seal off the affected area with plastic sheeting to prevent mould spores from spreading to other parts of the home.
**2. **Preparation
- Identify the Source:
- Identify and fix any sources of moisture, such as leaks, to prevent mould from returning after cleaning.
- Gather Supplies:
- Mould-specific cleaning products or a DIY solution (e.g., white vinegar, hydrogen peroxide, or bleach).
- Scrub brushes, sponges, and cloths.
- A spray bottle for applying the cleaning solution.
- A HEPA vacuum (optional) for cleaning up loose spores.
**3. **Cleaning Procedure
- Pre-Cleaning:
- Use a dry cloth or HEPA vacuum to remove loose mould spores and debris from the affected area.
- Apply Cleaning Solution:
- Spray the mouldy area with a mould-killing solution. For DIY, use one of the following:
- White Vinegar: Undiluted vinegar can be sprayed directly onto the mould and left for an hour before scrubbing.
- Hydrogen Peroxide (3%): Spray onto the mould, let it sit for 10 minutes, then scrub.
- Bleach Solution: Mix 1 part bleach with 10 parts water. Spray onto the mould, allow it to sit for 10 minutes, and scrub. Note: Bleach is harsh and can damage surfaces, so it’s not always recommended for porous materials.
- Spray the mouldy area with a mould-killing solution. For DIY, use one of the following:
- Scrub and Remove:
- Use a scrub brush or sponge to scrub the mould off the surface. Be thorough, especially in porous materials like wood or drywall.
- Rinse and Dry:
- Wipe down the area with a damp cloth to remove any remaining cleaning solution and mould residue.
- Dry the area completely using towels or fans to prevent moisture from returning.
**4. **Post-Cleaning Measures
- Dispose of Contaminated Materials:
- Place used cleaning materials and protective gear in a sealed plastic bag and dispose of them properly.
- Inspect for Hidden Mould:
- Check behind walls, under carpets, and in other hidden areas for additional mould growth.
- Monitor the Area:
- Keep an eye on the cleaned area for signs of mould returning. If mould reappears, it may indicate a persistent moisture problem.
**5. Prevention
- Control Humidity:
- Use a dehumidifier in damp areas, such as basements, to keep humidity levels below 50%.
- Improve Ventilation:
- Ensure proper ventilation in bathrooms, kitchens, and laundry rooms to reduce moisture build-up.
- Fix Leaks Promptly:
- Repair any leaks in roofs, windows, or plumbing to prevent water damage and mould growth.
- Regular Inspections:
- Regularly inspect areas prone to mould, such as bathrooms, basements, and around windows, to catch mould growth early.
DIY Mould Cleaning Guide
**1. Gathering Your Supplies
- Cleaning Solutions:
- White Vinegar: Effective and non-toxic. Ideal for most surfaces.
- Hydrogen Peroxide: Good for non-porous surfaces and more persistent mould.
- Bleach: Effective but harsh. Use only on non-porous surfaces like tiles.
- Tools:
- Scrub brushes of various sizes.
- Spray bottle for applying solutions.
- Disposable gloves, masks, and goggles for safety.
- Cloths or rags for wiping down surfaces.
**2. Step-by-Step Cleaning Process
- Safety Precautions:
- Wear your protective gear.
- Ensure the room is well-ventilated.
- Identify the Mould:
- Locate all areas of mould growth. Mould often appears as black, green, or white patches.
- Prepare the Area:
- Move furniture and items away from the affected area.
- If necessary, cover unaffected areas with plastic sheeting to prevent spore spread.
- Apply the Cleaning Solution:
- Spray the chosen cleaning solution directly onto the mouldy surface.
- Allow the solution to sit for the recommended time (e.g., 1 hour for vinegar, 10 minutes for hydrogen peroxide or bleach).
- Scrub the Mould:
- Use a scrub brush to thoroughly scrub the area, removing all visible mould.
- For stubborn mould, reapply the cleaning solution and scrub again.
- Rinse and Dry:
- Wipe down the area with a damp cloth to remove any remaining mould and cleaning solution.
- Dry the area completely to prevent future growth.
- Dispose of Cleaning Materials:
- Dispose of used rags, brushes, and protective gear in a sealed plastic bag.
- Final Inspection:
- Inspect the cleaned area to ensure all mould has been removed.
- If any mould remains, repeat the cleaning process.
Conclusion
Cleaning mould requires diligence and the right approach to ensure that it is completely removed and does not return. By following this specialist mould cleaning checklist and DIY guide, you can tackle mould safely and effectively in your home. Remember that if the mould infestation is extensive or if you have concerns about health risks, it’s advisable to consult or hire a professional mould remediation service to handle the situation.